Showing posts with label Budjet Lolita. Show all posts

Thursday, June 18, 2015

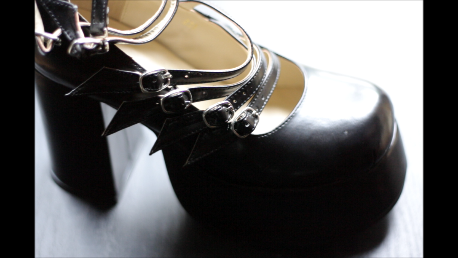
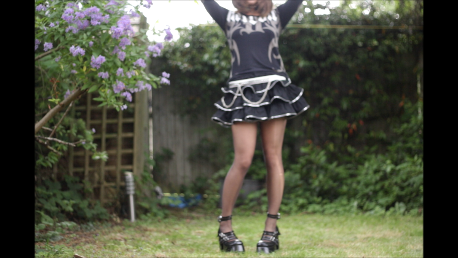
Purchased: Bodyline shoes258 (review)


I really love the chunky platforms and I don't really have any gothic shoes, so I decided to get this pair of platform heels from Bodyline.

 
After reading about a hundred different reviews about their designs I though that these ran small (like the RHS) and ordered them in 24.5cm thinking of fitting my medical insoles inside. Big mistake! They were ENORMOUS! I had to sell them and repurchase them in my actual size (23.5cm) and they are actually pretty roomy, so once I adjusted the straps they were beautifully comfy. They don't run big enough to size down, so if adjusting the straps isn't enough I think the issue is easily corrected with insoles. 

Snapshot 7 (10-06-2015 03-06)
I'm so amazing at capturing full body shots... -_-
 Bodyline may not have the most excellent quality shoes but for occasional-outrageous outfits these shoes are perfect. The thick heel + platform combo makes them a lot easier to walk in than they look!


As you can see, I have started a Youtube channel! I find making videos inspires me to try and get better with makeup and hair. I've never recorded myself before tough, so I hope I'm not too awkward... m(_ _)m

Monday, June 15, 2015

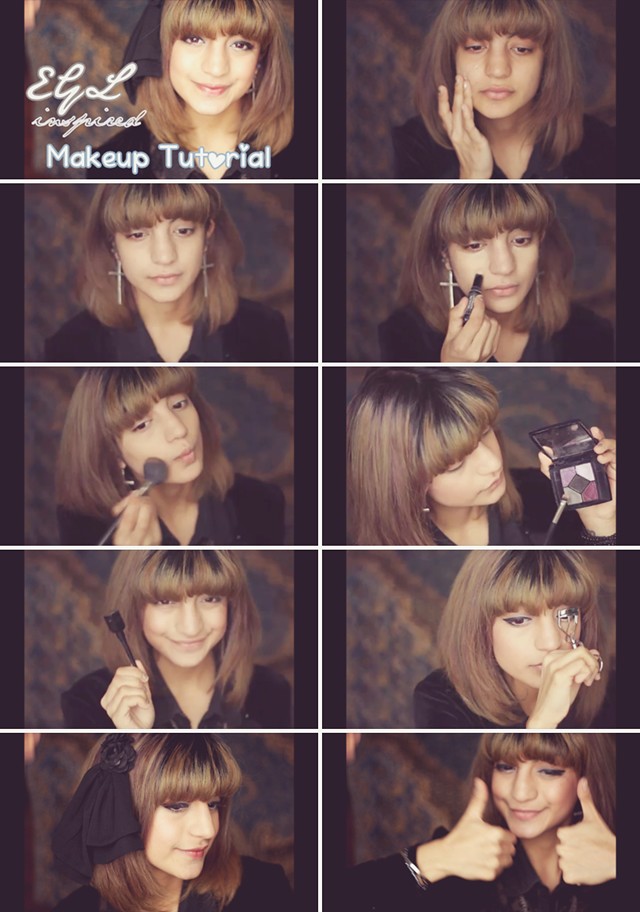
Makeup Monday: Everyday EGL inspired Makeup Tutorial + OOTD


I was pretty bored today and decided to make a little video ^^ I am hoping to challenge myself to get better with makeup + hair by uploading a tutorial every Monday! (๑•̀ㅂ•́)و

This is a pretty basic look for gothic/punk lolita. mostly using drugstore products (except my Dior eyeshadow palette which was a gift, but it can be easily replaced... Bourjois does good ones). I used BB cream as a base as it is intended as an everyday/basic/beginner tutorial. Anywho! Here is my face in all its derpy glory:

cats

Circle lenses: Venus Eye Wine Red
BB cream: Skinfood Good Afternoon (Honey Black Tea)
Concealer: Revlon Photoready (medium)
Loose Powder: Natural Collection (translucent)
Contouring: Sleek Contour Kit (light)
Blush: Bourjois Little Round Pot (48)
Eyeshadow: Dior 5 Couleurs Eyeshadow
Liquid eyeliner: Collection 2000 Fast Stroke (black)
Fake lashes: Eyemazing Amoyamo no.820 ('Rocabilly')

This is my first time recording and editing a video so I am happy to receive suggestions! I think I need a cuter and lighter background for instance... ^^ Also I'm in the process of fading the purple out of my hair, but I have to wait till next month to colour correct it 。゚(゚ノД`゚)゚。 It looks super ugly, eugh m(_ _)m

Tuesday, June 9, 2015

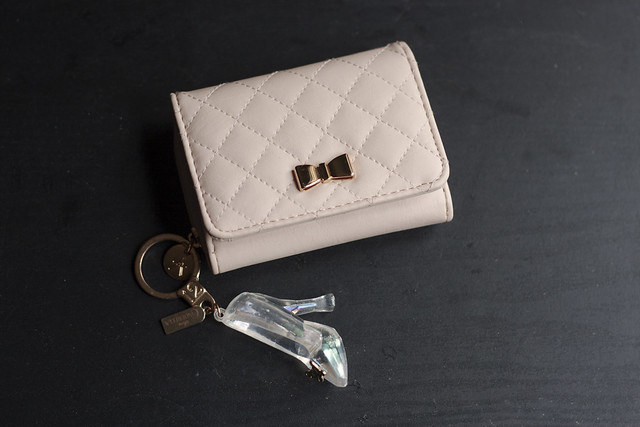
"DIY" Cinderella Purse

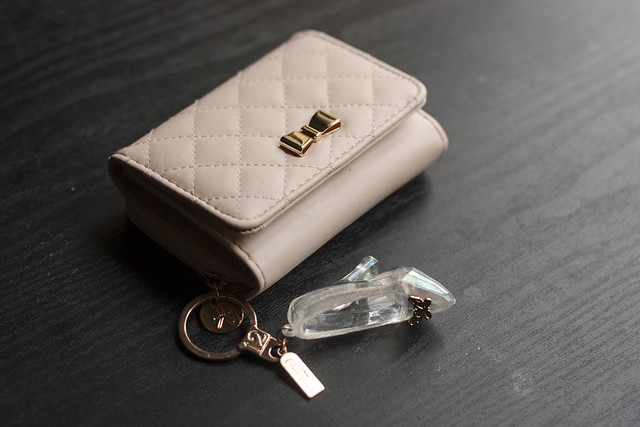
When Cinderella came out this year my boyfriend bought me one of the limited edition glass slipper key-rings they were selling at selected Odeon cinemas (人´∀`*)♡(˃͈ દ ˂͈ ༶ )

And I found the perfect match for it! Behold my cute new purse. I'm stupidly proud of how perfectly the rose gold details match! (which I haven't managed to capture 100%).


IMG_5650
Purse: Primark (£3) | Keyring: Disney Cinderella (£1.5)

I'm hoping Primark do a matching makeup box/bag so I can have a themed set ٩(◦`꒳´◦)۶

IMG_5646
Purse: Primark (£3) | Keyring: Disney Cinderella (£1.5)

Thursday, June 4, 2015

BTSSB Alice Clock handbag replica (review)

Last year I was in dire need of lolita handbags, and came across this cutie on Taobao... which happens to be a 2012 BTSSB x Disney collab design. I was a bit naive at the time and thought it could be a temporary compromise while I looked for the original, but so far I haven't had much luck.

There are quite a few stores selling this design, among them MuFish and Loris. The bag arrived wrapped in a cloth bag and stuffed to retain its shape.

02

The material is quite obvious pleather, which after a couple of uses softened and looked a lot more natural. As you can see it is quite detailed. I really love the scallops around the face of the clock, with the different suit symbols.

03

Details include rhinestones along the edges. In the original bag the clock hands are embroidered, here they are just part of the print.

04

The zip is not the sturdiest I have seen but for the price it works, I just try be careful with it.

05

And the reason I purchased these two bags, this gorgeous silver colourway (the original doesn't come in silver unfortunately):

 06 

There was a longer strap included to convert them into shoulder bags, which is very useful.

 07

All in all I think they are a very well made knock off. I actually prefer the size of these because the original bag looks a bit too big for my taste. l just wish they didn't say BtSSB! I'd feel less guilty about owning them!

Thank you for reading and I hope you found this useful ٩(。•‿•。)۶

Wednesday, December 31, 2014

Lolita 2014 Coords

It is nearly the end of the year! I thought I would share some of my daily lolita coords. I tend to keep things simple... while I love and admire OTT I've never been comfortable or very skilled in putting things together in that style. I'm also slowly starting to wear lolita as an everyday fashion rather than for the weekend or special events.


JSK: Chess Story Macaron et Mademoiselle - Blouse: vintage - Brooch: Sweet Mildred

JSK: offbrand - Tights: Grimoire - Shoes: Hush Puppies

JSK: Lief - Handbag: Taobao (Swimmer replica) - Brooch: Sweet Mildred
JSK: Alice and The Pirates - Blouse: Taobao (actually a dress)

A photo posted by uniciefelici (@uniciefelici) on

A photo posted by uniciefelici (@uniciefelici) on

Wednesday, November 6, 2013

Lolita in the Rain (Circle Cape Tutorial)

I'm a summer person. I have always dreaded long winters and rain and living in London of course we get both pretty regularly. I used to spend the season feeling miserable in my gigantic Land's End coat. (∩︵∩) And then I discovered lolita! I love wearing lolita in bad weather because with all the layers I'm guaranteed to feel warm and still look elegant. (。^‿^。) ♡

But of course we have a tiny problem in the UK. Rain. ヽ`、ヽ`ヽ♪(┌・。・)┌ヽ`、ヽ` I found a post on egl by a very talented lolita who had made herself a raincoat and it made me think I should do the same. The problem I have with coats and raincoats in lolita is that I find them bulky and not very graceful on me, which is the reason I favour jackets, capes and capelets. I also dislike the fact that lolita coats aren't waterproof. (ノ#-_-)ノ So here we are, a modified tutorial from a pair and a spare's great transparent cape tutorial!

Materials

ღ Waterpoof, breathable fabric (cannot be a stiff a fabric) (1m x standard width)
ღ Lining fabric: fleece (for exta warmth) (1m x standard width)
ღ Ornamental clasps / buttons
ღ Sewing Machine
ღ Ruler + Chalk + Scissors

Measurements:

ღ Cape length (from collar to hip, for example)
ღ Collar

Instructions:


Here is your fabric! ٩(。•‿•。)۶

Fold it in half, twice ~


Mark the length of you cape and draw a circle using this measurement (the length of your cape will be the radius). Mark the length of your collar and draw a circle using this measurement. Cut on the lines.


Unfold your fabric. You should have a nice big circle of fabric. Cut a straight opening and repeat these steps with the lining fabric.


With the right sides of your fabric and lining fabric together, sew along the hemline.

Turn inside out and press or finger press seams flat. Topstich collar.

 Mark where you want to position your clasps or buttons and attach.

 
Vóila! ʕ•ᴥ•ʔ ♡

There are several tutorials for normal wear that with simple adjustments (choosing a suitable fabric, adding trimmings) would work very well in lolita. Try searching through historical and vintage patterns.


  1. Butterick B5824 (Great gathered bottom, I dislike the collar however).
  2. McCalls 6001 (Vintage. A buttoned gathered dress).
  3. Circle Poncho (with Lolita appropriate colours and materials).
  4. Transparent Rain Cape (lengthened?) and the Audrey Cape
  5. Simplicity 8672 (Vintage. Princess coat).

Wednesday, December 28, 2011

Basic Lolita Skirt - Illustrated Tutorial

A tutorial based off the one by the wonderful Miscy (click for link). I tried it out during Christmas and ended up making three skirts... when I could hardly sew on a button before! I thought I could illustrate more of her instructions for other noobs like myself. I hope this is useful!


Materials needed:

ღ Sewing machine + Thread
ღ Fabric (~2.50m / 2-3 yards)
ღ Trimming (e.g. double lace)

ღ Measuring tape + Ruler + Chalk + Scissors  + Iron


Instructions:

Measure your waist and multiply it by three (e.g. 70cm x 3 = 210cm). Now mark with chalk where this length comes to in your piece of fabric. Decide how long you want your skirt to be. I am 156cm / 5'1" and I used 50cm / 20".

You should have a big rectangle that measures (your waist x 3) by the length of your skirt. In this example, 210cm x 50cm.


Fold this piece of fabric in half and cut so you have two identical but smaller rectangles (110cm x 50cm).

Match both pieces of fabric and sew a small straight stich on the sewing allowance line you have drawn as a guide. Zig zag close to the straight stich to make a more proffesional looking edge.
Photobucket
Cut the excess of the sewing allowance as close as you can to the zig zag stich you have just made.
Photobucket
Nice! Separate both parts and iron your new seam to one side. You will have a very long piece of fabric, three times the lenght of your waist. Now to gather!
Photobucket
Lower your thread tension and set your stich lenght to the longest. Sew two straight stiches both along the red line and parallel to it.
Photobucket

Take hold of one of the threads and slowly, really carefully pull the other. This will form a small gather. Continue to do this along the whole lenght of your piece of fabric. Don't pull one thread and then the other, it has to be the same one you keep pulling. When you finish, pin it down to the waistband! Straight stich down.

Photobucket

Turn the piece of fabric, so you are now looking at the right side of it.
Photobucket

Fold the waist band into itself and press it down. Straight stich over the gathered edge carefully (because this stich will show on the skirt. This is called topstiching). The gathered fabric of the skirt should be looking neat and finished by now.
Photobucket
[Lace hemming] Pin your trimming upside down along the length of your skirt and straight stich down.

Fold the trimming under and press down again. Straight stich and you should have a neatly trimmed bottom hem.

Sew the sides of the skirt together three quarters of the way, then hem each sides separatedly. Sew hook / button to close up the gap.

Enjoy your new lolita skirt! ٩(。•‿•。)۶